Showing posts with label SharePoint 2010. Show all posts

14/04/2014

Custom thank you dialog in a Survey

How to create a custom thank you dialog in a SharePoint 2010 survey


This blog post describes how to create a custom thank you dialog for all your SharePoint 2010 Surveys. The solution is implemented by the use of Visual Studio and SharePoint Designer. I have found many blog posts and questions in forums on this matter, but none of them seems to have a solution that works on a multiple paged survey with validation.

This solution works on a multiple paged survey with OOTB validation!

1) Create custom survey list definition

This is described in step 1 of this blog post: Lillebuen IT blog post: Hide Save and Close button in Survey

2) Create an item event receiver  for the list
  • Right click on the list definition folder in Visual Studio
  • Choose Add > New Item...
  • Choose Even Receiver and give the event receiver a name, e.g. MyEventReceiver
  • In the customization wizard:
    • Choose List Item Event
    • Choose your survey list definition (MySurvey)
    • Check "An item is being added" and "An item is being updated"
  • Add code to display a dialog after the invoking the base methods
The Item event receiver shall look like this:

namespace Namespace.ListDefinitions.MySurvey.MyEventReceiver
{
    public class MyEventReceiver: SPItemEventReceiver
    {
        private readonly HttpContext _currentContext;
        public SurveyListReceiver()
        {
            if (HttpContext.Current != null)
            {
                _currentContext = HttpContext.Current;
            }
        }

        private void DisplayConfirmationMessage()
        {
            if (_currentContext != null)
            {
                _currentContext.Response.Write(
                    "<script type='text/javascript'>alert('We have received your answers. Thank you for your participation.');</script>");
            }
        }

        public override void ItemAdding(SPItemEventProperties properties)
        {
            base.ItemAdding(properties);
            try
            {
                DisplayConfirmationMessage();
            }
            catch (Exception ex)
            {
                // error handling code
            }
        }

        public override void ItemUpdating(SPItemEventProperties properties)
        {
            base.ItemUpdating(properties);
            try
            {
                DisplayConfirmationMessage();
            }
            catch (Exception ex)
            {
                // error handling code
            }
        }
    }
}


I have tried displaying the Thank you text in a SharePoint:UI:Dialog, but I haven't figured out how. It seems like I cannot add script references when doing it like this. Please tell me if anyone have a solution to this.

The reasons for implementing it like this are many:
  • There are many blog posts suggesting that the PreSaveAction javascript method can be invoked, but this method is invoked before the OOTB survey validation. A dialog saying thank for your response, with a survey containing errors is quite stupid.
  • Others suggest setting the Source in the URL. This works perfectly on a survey with one page. But when a survey contains more than one page, the survey generates more than on response per actual End User response and the thank you page never shows...
  • I have also tried doing a redirect in the methods above, but this will cancel the event.
  • I have also tried doing a redirect in the ItemAdded and ItemUpdated methods instead, but this is not possible since these methods are asynchronously, itemAdding and itemUpdating however are synchronously.

SharePoint 2010 Surveys: Hide Save and Close button

How to hide the Save and Close button in  a SharePoint Survey


Why?

When creating a survey with more than on page the "Save and Close" button appears in the Survey dialog. If the End User presses the Save and Close button, the End User can finish the survey response later. This is actually a good functionality in many cases, e.g. very long surveys. My experience shows however that the End User can easily misunderstand the Save and Close, and believe that they are done with the survey response.
The only one that can edit and find such an incomplete survey response is the End User. No admin users can ever find this response. The only way to find out is to check the database (if you suspect that this has happened). How to do this is described in this post: Incomplete responses.

A better way to fix this for all future survey responses is however to hide the "Save and Close" button by creating a customized survey list definition.

How? 


1) Create a new list definition in Visual Studio

  • Create a new farm solution
  • Add > New Item...
  • Choose List and give it a name
  • Set display name and choose "Create a customizable list based on:" and "Default (Blank)"
  • Finish
  • Remove the list instance (you do not need it)
  • Edit Elements.xml (see below)
  • Edit Schema.xml (see below)
The Elements.xml shall contain the following:
 
 <?xml version="1.0" encoding="utf-8"?>
<Elements xmlns="
    <ListTemplate
        Name="MySurvey"
        Type="102"
        BaseType="4"
        OnQuickLaunch="TRUE"
        FolderCreation="FALSE"
        SecurityBits="12"
        Sequence="510"
        DisplayName="MySurvey"
        Description="My List Definition"
        Image="/_layouts/images/itsurvey.png"/>
</Elements>
 

Edit the Schema.xml file:
  • Copy all content from the %14%/template/feature/surveylist/schema.xml into an editor
  • Edit the line that starts with <List xmlns:ows to match your list:
<List xmlns:ows="Microsoft SharePoint" Title="MySurvey" FolderCreation="FALSE" Direction="$Resources:Direction;" Url="Lists/MySurvey" BaseType="4" xmlns="http://schemas.microsoft.com/sharepoint/">
  • Open your schema.xml in Visual Studio and replace all content
Now you can test the custom survey. It shall be exactly the same as the OOTB survey.

2) Create custom NewForm

  • Navigate to your custom or an OOTB survey in the browser.
  • Site Actions > Edit in SharePoint Designer
  • Wait until SharePoint Designer is ready!
  • Navigate to your survey in SharePoint Designer
  • Open the NewForm.aspx file in Advanced Mode
  • Wait until SharePoint Designer is ready!
  • Copy all the code
  • Open an editor and past in the code
  • Go to Visual Studio and create a new application page (Add > New Item > Application Page)
  • Name the file MyNewForm.aspx
  • Move the file (not the parent folders) into your list definition created in step 1 (use drag and drop)
  • Delete the layout folder in Visual Studio
  • Select MyNewForm.aspx in the Solution Explorer and change its property "DeploymentType" to "ElementFile"
  • Open MyNewForm.aspx
  • Delete all content except the first line; also change the MasterPageFile property, result:
<%@ Page language="C#" MasterPageFile="~masterurl/default.master" Inherits="Microsoft.SharePoint.WebPartPages.WebPartPage,Microsoft.SharePoint,Version=14.0.0.0,Culture=neutral,PublicKeyToken=71e9bce111e9429c" meta:webpartpageexpansion="full" meta:progid="SharePoint.WebPartPage.Document"  %>
  • Copy all the content except the first line (the one displayed above) from the editor
  • Paste into MyNewForm.aspx
  • Remove all content in the ZoneTemplate tag in MyNewForm.aspx
All that is left is to use the MyNewForm.aspx in the custom Survey:
  • Open the schema.xml file
  • Navigate to the bottom of the page.
  • Edit the line that starts with <Form Type="Newform
<Form Type="NewForm" Url="NewForm.aspx" Template="SurveyForm" SetupPath="features\$SharePoint.Feature.DeploymentPath$\MySurvey\MyNewForm.aspx" WebPartZoneID="Main" />

Test that the correct version of NewForm is displayed in the survey by adding a temporary javascript alert or a paragraph with some temporary text.

3) Create custom EditForm

Same as for NewForm, see step 2

4) Remove Save and Close button in NewForm and EditForm

In EditForm.aspx and NewForm.aspx between the SharePoint:UIVersionedContent end tag and asp:Content end tag add this javascript:

<script type="text/javascript">
    var x = document.getElementsByTagName("input");
    for (var i = 0; i < x.length; i++) {
        if (x.item(i).type == "button" && x.item(i).value == "Save and Close") {
            x.item(i).style.display = "none";
        }
    }
</script>


The script iterates through all input controls. If the value of the control is "Save and Close", the display style property is set to "none".

References

09/11/2013

Managed Metadata column disabled in List when creating a new item in the list.

When you try to set a Managed Metadata column for a new list item it looks like this:

 
Fix:
  • List Settings > Click on Managed Metadata column
  • Select Term Set (if selected before do it any way)
  • Click OK
 When you try to set a Managed Metadata column for a new list item now it looks like this:

09/10/2013

Modify your Master Page to display the top level web description

1) Create a new Web Control

The web control shall retrieve the description from your top level site.

In your Visual Studio project, right click and choose Add > New Item... In the New Item dialogue select Module. Give the new module a name (SiteDescription) and click OK.
Remove the txt file.
Add a class (Add > Class...), give it a name (SiteDescription) and click Add.
The source code of your class will look something like this:

namespace NameSpace.SiteDescription
{
    /// <summary>
    /// SiteDescription class is used to displayes the description of the top level web.
    /// </summary>
    [ToolboxData("<{0}:SiteDescription runat=server></{0}:SiteDescription>")]
    public class SiteDescription : WebControl
    {
        private string _alt = "- default description of site";

        /// <summary>
        /// override so that the surrounding tag is a div insteadof a span
        /// </summary>
        protected override HtmlTextWriterTag TagKey
        {
            get { return HtmlTextWriterTag.Div; }
        }

        /// <summary>
        /// Add the description as an em tag
        /// </summary>
        /// <param name="writer"></param>
        [System.Security.Permissions.PermissionSet(System.Security.Permissions.SecurityAction.Demand, Name = "FullTrust"
            )]
        protected override void AddAttributesToRender(HtmlTextWriter writer)
        {
            writer.RenderBeginTag(HtmlTextWriterTag.Em);
            writer.WriteEncodedText(_alt);
            writer.RenderEndTag();
        }

        private void InitiateDescription()
        {
            try
            {
                var webApp = SPContext.Current.Site.WebApplication;
                SPWeb siteToUse = SPContext.Current.Web;
                foreach (SPSite site in webApp.Sites)
                {
                    if (site.RootWeb.Title.Equals("Title")) /* your title...*/
                    {
                        siteToUse = site.RootWeb;
                        break;
                    }
                }
                if (!String.IsNullOrEmpty(siteToUse.Description))
                {
                    _alt = siteToUse.Description;
                }
              
            }
            catch (Exception e)
            {
                /*error handling*/
            }
        }

        /// <summary>
        /// Create new web control
        /// </summary>
        public BannerDescription()
        {
            InitiateDescription();
        }
    }
}


Edit the Elements.xml file of your new Web Control:

<Elements xmlns="http://schemas.microsoft.com/sharepoint/">
  <Control
   Id="SiteDescription"
   Sequence="24"
   ControlClass="Namespace.SiteDescription.SiteDescription"
    ControlAssembly="Namespace, Version=1.0.0.0, Culture=neutral, PublicKeyToken=xxx">
  </Control>
</Elements>


2) Use your description web control in your master page

<NameSpace:SiteDescription ID="SiteDescriptionWebControl" runat="server"/>

Visual Studio will prompt you with the right import statements.

07/10/2013

Unable to change Navigation Settings

Error message from ULS log when trying to modify Navigation Settings (Site Settings > Navigation):

Unable to retrieve TopNavigationBar SPNavigationNodeCollection from Web at: <url>. The SPNavigation store is likely corrupt.

Run the following db script:

INSERT INTO [Cotent_db].[dbo].[NavNodes]
 ([SiteId], [WebId], [Eid], [EidParent], [NumChildren], [RankChild],[ElementType], [Url],
 [DocId], [Name], [DateLastModified], [NodeMetainfo], [NonNavPage], [NavSequence], [ChildOfSequence])
SELECT DISTINCT SiteId, WebId ,1002 ,0 ,0 ,1 ,1 ,'', NULL, 'SharePoint Top Navbar',getdate() ,NULL ,0 ,1 ,0
 FROM [Cotent_db].[dbo].[NavNodes] WHERE WebId NOT IN (SELECT WebId FROM [Cotent_db].[dbo].[NavNodes] WHERE Eid = 1002)
 

Thanks to:
http://bimoss.wordpress.com/2009/09/29/unable-to-modify-global-navigation-add-headinglink/

02/10/2013

Add Site Column to existing Content Type in code

How to add a new Site Column to an existing Content Type from code


This post describes how to create a new column, add it to an existing Content Type in an existing feature and last run an upgrade in PowerShell of the feature.

Feature.xml file:
<?xml version="1.0" encoding="utf-8" ?>
<Feature xmlns="
http://schemas.microsoft.com/sharepoint/" Version="2.0.1.0">
  <ElementManifests>
    <ElementManifest Location="NewColName\Elements.xml" />
  </ElementManifests> 
  <UpgradeActions>
    <VersionRange EndVersion="3.0.0.0">
      <ApplyElementManifests>
        <ElementManifest Location="NewColName\Elements.xml" />
      </ApplyElementManifests>
      <CustomUpgradeAction Name="AddFieldToContentType">
        <Parameters>
          <Parameter Name="FieldId">x-x-x-x-x</Parameter>
          <Parameter Name="ContentTypeId">xxxx</Parameter>
          <Parameter Name="PushDown">TRUE</Parameter>
        </Parameters>
      </CustomUpgradeAction>
    </VersionRange>
  </UpgradeActions>
</Feature>


The NewColName\Elements.xml contains the definition of the new column and shall be added in both the ElementManifest section and the UpgradeActions-ApplyElementManifest section. The ElementManifest section is used when deploying the feature the first time, and the UpgradeAction section is used when upgrading the feature. The new version of the feature is 2.0.1.0, and the upgrade action shall be active until version 3.0.0.0 (EndVersion attribute).
The CustomUpgradeAction refers to an upgrade action named "AddFieldToContentType". The action takes three parameters the new field ID the existing Content type ID and a parameter called PushDown, witch configures of the Content Type changes shall be pushed down to child Content Types.

The new column is defined in NewColName\Elements.xml:
<?xml version="1.0" encoding="utf-8"?>
<Elements xmlns="
http://schemas.microsoft.com/sharepoint/"> 
  <Field

    Name="NewColName"
    StaticName="NewColName"
    Type="Text"
    Required="FALSE"
    DisplayName="NewColName"
    Description="The new column"
    Group="NewGroup"
    ID="{x-x-x-x-x}"
    Overwrite="TRUE" OverwriteInChildScopes="FALSE" 
    SourceID="http://schemas.microsoft.com/sharepoint/v3"
    xmlns="http://schemas.microsoft.com/sharepoint/" />
</Elements>


Create an event receiver and override the FeatureUpgrading method, this method is invoked when the feature is upgraded (surprise!) and the upgrade action name is taken as a parameter:
public override void FeatureUpgrading(
  SPFeatureReceiverProperties properties,
  string upgradeActionName,
  System.Collections.Generic.IDictionary<string, string> parameters)
{
  if (properties.Feature.Parent is SPSite)
  {
    SPWeb web = ((SPSite) properties.Feature.Parent).RootWeb;
    switch (upgradeActionName)
    {
      case "AddFieldToContentType":
        string fieldId = parameters["FieldId"];
        string contentTypeId = parameters["ContentTypeId"];
        bool updateChilds = true;
        bool flag;
        updateChilds=bool.TryParse(parameters["PushDown"],out flag);
        AddFieldToContentType(web,contentTypeId,fieldId,updateChilds);
        break;
      default:
        break;
    }
  }
}


AddFieldToContentType method:
private void AddFieldToContentType(SPWeb web, string contentTypeId, string fieldId, bool updateChilds)
{
  SPContentType type = web.ContentTypes[new SPContentTypeId(contentTypeId)];
  type.FieldLinks.Add(new SPFieldLink(web.Fields[new Guid(fieldId)]));
  type.Update(updateChilds, updateChilds);
}


The last thing to do is to override the FeatureActivated method, this method is invoked when the feature is activated and it will make sure that the new Field also is added to the Content Type the first time the feature is activated:
public override void FeatureActivated(SPFeatureReceiverProperties properties)
{
  if (properties.Feature.Parent is SPSite)
  {
    SPWeb site = ((SPSite) properties.Feature.Parent).RootWeb;
    const string fieldId = "x-x-x-x-x";
    const string contentTypeId = "xxx";
    AddFieldToContentType(site, contentTypeId, fieldId, true);
  }
}


So to upgrade the feature run this script in PowerShell :
$versionFolder = "C:\temp\"
$solutionName = “x.wsp”
$solutionPath = $versionFolder + $solutionName
$siteUrl = "
http://.../"
$featureId = "{x-x-x-x-x}"

Update-SPSolution –Identity $solutionName –LiteralPath $solutionPath –GacDeployment
# wait for it to finish
$site = get-spsite $siteUrl
$feature = $site.Features | where {$_.Definition.Id -eq $featureId}

if($feature)
{
    $ex = $feature.Upgrade($true)
    Write-Host $ex #if anything went wrong this is printed
}

18/09/2013

SharePoint portalsuperreaderaccount and portalsuperuseraccount

Get and Set super reader and super user accounts


How to get and set the SharePoint portalsuperreaderaccount and portalsuperuseraccount:

$w = Get-SPWebApplication "url"
$w.properties["portalsuperuseraccount"] = "domain\username"
$w.properties["portalsuperreaderaccount"] = "domain\username"
$w.Update()
Write-Host "superreader: " $w.properties["portalsuperreaderaccount"]
Write-Host "superuser: " $w.properties["portalsuperuseraccount"]


Error message that can appear if not properly set:

Object Cache: The super reader account utilized by the cache does not have sufficient permissions to SharePoint databases.
To configure the account use the following command 'stsadm -o setproperty -propertyname portalsuperreaderaccount -propertyvalue account -url webappurl'. It should be configured to be an account that has Read access to the SharePoint databases.
 Additional Data:
 Current default super reader account: NT AUTHORITY\LOCAL SERVICE


Or this error message

Trying to store a checked out item (/PAGES/PAGENAME.ASPX) in the object cache.  This may be because the checked out user is accessing the page, or it could be that the SharePoint system account has the item checked out.  To improve performance, you should set the portalsuperuseraccount property on the web application.  See the documentation for more information.

03/09/2013

SharePoint 2010 Surveys - incomplete results

List the user of all Incomplete Survey Results

Incomplete results means that a user has pressed Save and Close in the Survey instead of Finish.
  1. Find Site ID for the Survey Site
    • Central Admin > Change Site Collection administrators
    • Change site collection and the site id will appear in the URL
  2. Find List ID for the Survey
    • List Settings > Audience Targeting
    • Copy the list ID from the URL
  3. Run DB Query:
Select userdata.tp_author,
(Select tp_Title from UserInfo where UserInfo.tp_ID=userdata.tp_author and tp_siteID='siteid')
As UserName from USERDATA
where tp_ListId like 'listid' and tp_level = 255

SharePoint 2010 Federated Search web part

Federated Search web part, Search Scope and Federated Location


  1. Create Search scope in Central Admin
    • Central Admin > Application Management > Manage Service Applications > Search Service Application > Scopes
    • New Scope
    • Set result page and rules to filter the search result, e.g. "YourUserProperty = 1", where YourUserProperty is a property or simply "contentclass = urn:content-class:SPSPeople"
  2. Create "Search Scopes" in Central Admin
    • Central Admin > Application Management > Manage Service Applications > Search Service Application > Manage Federated Locations
    • New Location
      • Set properties:
      • More Results Link Template: add an URL and a "*" after each search term when pressing the More Results link, e.g. "yourresultpage.aspx?k={searchTerms}*"
      • Query Template: add scope if preferred, e.g. {searchTerms} scope:YourScope
  3. Add "Federated Results" web part to the Site
    • Set "Federated Location" to a location created in Central Admin

04/12/2012

SharePoint 2010 Document Sets

Document sets basics


Document sets are a part of SharePoint Document Management. Document Set enables grouping multiple documents, that support a single project or task, together into a single entity. A document set can in many ways be thought of as a folder, but a document set has some additional features:
  • Share the meta data
  • Can be versioned
  • Document sets use Content Types, Document set Content Types, you can create your own custom document set content type, a Document Set can therefor have all Content Types features (information policies, workflows and meta data)
  • Shares a common home page
Examples:

Test Document Set

A test Document Set can be created to group all test documents related to an application. Allowed Content Types in a test Document Set can be Test descriptions (step by step test steps), Test Reports (results of a test run through) and Test Plans (plans for how, who and when to run the tests).
The Test Document Set can contain a column named category, this category can always be set to "Test documentation" when documents are added to the document set. As an alternative the Document Set may contain only test documents connected to a specific release. The document set can then have another property named release version. This property can also be propagated down to all contained documents. The Test Document Set should have a description containing what documents should be placed in the set.

Design Document Set

A design Document Set can be used as a group of design documentation and supporting documents. The allowed Content Types would typically be Design Document Content Type and maybe a general Content Type used for all supporting documents. A periodic review workflow shall be associated with the document set to ensure that the documents are reviewed each year.

Department Budget Document Set:

A Document Set containing all budgets for 2012 for a specific department and sub departments.


How to create a Document Set Content Type

The document set feature must be activate: Site Settings > Site Collection Features:


Create a new document set: Site Settings > Galleries > Content Types > Create, the document set Content Types are displayed in the Document Set Content Types group:


When the new document set is created start by adding columns, click on Add from existing site columns or Add from new site column. Set the columns to required or not (click on the column after it is created):

Possible Document Set settings:
  • Restrict the Content Types allowed in the document set by setting the Allowed Content Types: the default settings are that only documents with Content Type document are allowed
  • Default Content: is there any content that always shall be added to the document set when created?
  • Consider if each file in a document set shall be prefixed by the name of the Document Set
  • Which column values for the Document Set should be automatically synchronised to all documents contained in the set? If a property is set for the document set this can be synchronised to all containing documents.
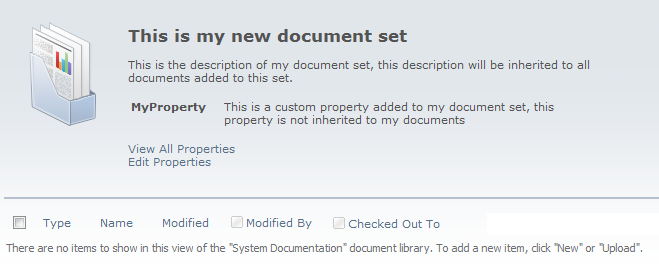
  • Consider what properties shall be shown on the welcome page: the welcome page is shown when opening the document set, a default welcome page is shown below
  • Customise the welcome page: you can change the text and image shown
Associate the new Document Set Content Type with a document library: Library > Library Settings > Add from existing Site Content Types. Choose Content Type Group and add it.

Now try to create a new document set. Go to the library, choose Documents > New Document > My Document Set:

Set name and properties of your new document set.

The new document set with the default welcome page will look like this:


Add a new document to the document set: Documents > New Document > Document, notice that the only Content Type allowed is Document:


The Document Set appears like this in the library:

SharePoint 2010 Content Types

Content Types basics


A content type is a reusable collection of meta data (columns), workflow, behaviour, and other settings for a category of items or documents in a list or document library. Content types enable you to manage the settings for a category of information in a centralised, reusable way. A content type defines the attributes of a list item, a document, a document set or a folder.

Example of a content type: Test description document content type:

Test description is a document containing step by step test steps that is used when testing an application.The test description Content Type is used for test description documents in a document library that contains system related documentation.
All test descriptions must be tagged with what system the test description tests and who is the owner of the document. These are properties associated with the test description Content Type.
All test descriptions has the same document headings, document header and document footer. It is therefor created a test description document template. This template is associated with the test description Content Type. When creating a new test description in the document library this template is automatically used.
A periodic review is associated with the test description, a review is forced on the document owner before every release of the system (released periodically). This is a workflow associated with the Content Type.
For traceability reasons auditing is also required, every time a test description is changed the id of the test description document is logged. This is an Auditing Policy associated with the Content Type.
The id associated with the Content Type is prefixed with TDD (Test Description Document), this is an example of a custom feature of this Content Type.

This can be specified for a content type:
  • Properties to associate with items of its type: columns of the content type, these are displayed when a new document is created and when the document is shown in the document list. The columns are also shown in the Document Information Panel in Office products. Columns can be reused.
  • Metadata to associate with items of its type: Metadata is information about a document that is used to categorise and classify your content. Metadata is associated with a content type as a column. A column can be mandatory to ensure that the meta data is provided.
  • Workflows that can be started from items of its type: e.g. periodic workflow review
  • Information management policies to associate with items of its type: 
    • auditing: logging when an event occurs
    • retention policies: define retention stages and an action that happens at the end of each stage, e.g. moving the item to the Recycle Bin, deleting an item or moving an item to another location
    • labels to ensure that physical copies of each document are properly identifiable
    • print restrictions, to ensure that sensitive employee-related documents are printed only on secure printers 
  • Document templates (for document content types)
  • Custom features: e.g. changing the id pattern
Document libraries and lists can contain multiple content types. SharePoint comes with a set of OOTB Content Types. Content types are organised into a hierarchy that lets one content type inherit its characteristics from another content type. Content types can be shared on different SharePoint sites.

21/11/2012

Adding your custom styles in your SharePoint 2010 Rich Html Editor

This blog post describes how to add a custom styles in your Rich Html Editors.

The new style will appear when editing e.g. a wiki or site page in the Markup-Style dropdown:


Or in the Table-Style drop down:


1: Create the style
Add CSS file to managed folder /layouts/Namespace/wiki.css

Example headings (Markup-Style dropdown):

H1.ms-rteElement-MyH1
{
    /* This name will be displayed in the drop down */
    -ms-name: "My heading 1";
}
.ms-rteElement-MyH1
{
    background-color: #597087;
    color: #ffffff;
}

Example tables (Table-Style drop down) - Table with coloured header row and zebra stripes:

.ms-rteTable-10,
.ms-rteTableHeaderFirstCol-10,
.ms-rteTableHeaderLastCol-10,
.ms-rteTableHeaderOddCol-10,
.ms-rteTableHeaderEvenCol-10,
.ms-rteTableFirstCol-10,
.ms-rteTableLastCol-10,
.ms-rteTableOddCol-10,
.ms-rteTableEvenCol-10,
.ms-rteTableFooterFirstCol-10,
.ms-rteTableFooterLastCol-10,
.ms-rteTableFooterOddCol-10,
.ms-rteTableFooterEvenCol-10,
TD.ms-rteTable-10,
TH.ms-rteTable-10,
.ms-rtetablecells
{
    /* This name is displayed in the drop down */
    -ms-name:"Table Style 4 - Zebra stripes";
    border-left: none;
    border-right: none;
    text-align:left;
    line-height:2;
    vertical-align: top;
    padding:2px;
    padding-left: 5px;
}
.ms-rteTableHeaderFirstCol-10,
.ms-rteTableHeaderLastCol-10,
.ms-rteTableHeaderOddCol-10,
.ms-rteTableHeaderEvenCol-10
{
    background-color: #b5c1ce;
    color: white;
    border-top: solid #D5DCE3 1px; 
    border-bottom: solid #D5DCE3 1px;
}
.ms-rteTableFooterFirstCol-10,
.ms-rteTableFooterLastCol-10,
.ms-rteTableFooterOddCol-10,
.ms-rteTableFooterEvenCol-10
{
    font-weight: bold;
    border-top: solid #D5DCE3 2px; 
    border-bottom: solid #D5DCE3 2px;
}
.ms-rteTableFirstCol-10, 
.ms-rteTableLastCol-10
{
    font-weight: bold;
}
.ms-rteTable-10 tr.ms-rteTableOddRow-10 {
 background-color: #eee;
}
.ms-rteTable-10 tr.ms-rteTableEvenRow-10 {
 background-color: #fff;
}

2: Add Css to master page or default page layout

<SharePoint:CssRegistration ID="CssRegistrationWiki" 
   name="/_layouts/Namespace/wiki.css"  After="corev4.css" runat="server"/>3: 


It is not possible to remove any existing table or heading styles. You can change existing style or add new styles, but not delete. Also, it is not possible to change the name of an existing style.

A common thing you would like to do is change the default table style, this can be done by using "-default" instead of "-10" in the style selectors in the example above. But remember that the name of the default table style will never be changed.

There is a way to do this but it requires you to add a parameter every place the "PublishingWebControls:RichHtmlField" field is used, see this blog post at sharepoint blues.

08/11/2012

"Cannot uninstall Language Pack" and Unexpected System.NullReferenceException when trying to access the web site

How to fix this error

The message "Cannot uninstall Language Pack" appears when doing Uninstall-SPSolution and an Unexpected System.NullReferenceException appears when trying to access the web site. This error may only be present on one of the servers in a farm.
  1. Stop the SharePoint Timer Service (OWSTIMER).
  2. On the problem server, navigate to:
    1. Windows Server 2003 location: Drive:\Documents and Settings\All Users\Application Data\Microsoft\SharePoint\Config\GUID and delete all the XML files from the directory.
    2. Windows Server 2008 location: Drive:\ProgramData\Microsoft\SharePoint\Config\GUID and delete all the XML files from the directory.
  3. Delete all the XML files in the directory or sub directories, not the .INI file.
  4. Open the cache.ini with Notepad and reset the number to 1. Save and close the file.
  5. Start the service on the server and wait for XML files to begin to reappear.
  6. IIS Reset

07/11/2012

Create custom enterprise wiki

How to create a custom enterprise wiki


1: Create a web template that extends the enterprise wiki template:

<?xml version="1.0" encoding="utf-8"?>
<Templates xmlns:ows="Microsoft SharePoint">
    <Template Name="YourWiki" ID="0">
        <Configuration ID="0"
                       Title="Your Enterprise Wiki"
                       Hidden="FALSE"
                       ImageUrl="/_layouts/images/stts.png"
                       Description="..."
                       DisplayCategory="Custom"
                       ProvisionClass="<Namespace>.YourProvider"
                       ProvisionAssembly="<namespace>, Version=1.0.0.0, Culture=neutral, PublicKeyToken=xxx" 
                       RootWebOnly="False">
        </Configuration>
    </Template>
</Templates>

2: Deploy the custom template to the folder: {SharePointRoot}\Template\1033\XML

3: Create the Custom Provider class:

class YourProvider : SPWebProvisioningProvider
{
    public override void Provision(SPWebProvisioningProperties props)
    {
        props.Web.ApplyWebTemplate("ENTERWIKI#0")
        var code = new SPSecurity.CodeToRunElevated(CreateSite);
        SPSecurity.RunWithElevatedPrivileges(code); //Excecute elevated
    }
    private void CreateSite() 
    {
        using (SPSite site = new SPSite(Properties.Web.Site.ID))
        {
            using (SPWeb web = site.OpenWeb(Properties.Web.ID))
            {
                // your custom code
            }
        }
    }     
}

That's it :)